Sunday 17 November 2013

Menu Board

I am absolutely awful at meal planning and grocery shopping. 

Seriously. I'm pretty sure that my toddler would do a better job at putting together dinners than I would!
I want to change! That's the first step, right?! 

So when I saw Sarah's menu board, I knew I had to make it! 
It fits my crafting criteria - quick to make, simple, and upcycled!  


All of the materials I used were going to be thrown out.
I used old file folders for the food cards and little boxes for the extras. 
Sarah wrote the ingredients on the back of all the cards, but I managed to only get a few written out since most ingredients are based on whatever is on sale so the meal is more of a guide than a recipe. 


Once everything was glued to the board with hot glue, I nailed in the little piece that holds it on the wall.
(As a photography graduate, I am embarrassed to say that I don't know what that piece is called!)
And in hindsight, I really should have nailed the hanger thing onto the board before bulking up the front of the frame - oops!


Grammatical shortcomings aside, I think it looks pretty cute in my hallway beside my favorite frame. 

When I have used it, it's really useful and takes away a lot of my dinner stress! I have been super busy lately with dog related business, so I have neglected the planner in me. 

All in all, this project cost me $0 so I consider that a craft win!

{Daily Random Fact: The tallest species of trees in the world include the Coast Redwood, Giant Sequoia, Coast Douglas Fir, Sitka Spruce and Australian Mountain Ash.}

Saturday 7 September 2013

Bart Puzzle Frame

Mel and Karam love the Simpsons. 


They have a lot of paraphernalia, so I wanted to do something different.

I have a few mosaic puzzles, 2 of which are related to The Simpsons, and the others are Winnie the Pooh themed. 
I used an old cabinet door at the frame. 


So I decided to use mod podge to glue the puzzle to itself, using sheets of paper to keep it from sticking to the puzzle holder. 


Once it was dry, I measured it and cut each piece the same size.
I used a variety of the puzzle, but kept his eyes to be able to tell that it's Bart.
(I didn't take a lot of pictures because it was a little time consuming and I put it down a lot.)

Mel and Karam loved it, and that's the important part! 

{Daily Random Fact: Wombats are unique in that they poop out cubic or squared shaped feces.}

Friday 19 July 2013

B is for Brayden

Recently, my coworker went on maternity leave so I made her this frame for her baby boy.


It's no secret that I love buttons! And my mom, at our last girls' night, gave me a few small boxes of different coloured buttons. I knew these were the ones I had to use for this frame because they are all the same so it looks more uniform. 
I did add 2 stars that were from my stash, but they fit pretty nicely!

Basically, I just layed out the buttons, and started hot gluing them to the glass. 
That's it!

Oh the many places you can go with buttons!

{ Daily Random Fact: The name for "piggy banks" comes from the use of family money jars in the Middle Ages made from a type of clay called pygg }

Tuesday 14 May 2013

Chunky Infinity Scarf

Better late than never, right?

I was recently commissioned to make a black scarf.

One of my besties asked me to make her a black scarf but didn't give me anything else she specifically wanted, so I took this opportunity to try this chunky infinity scarf...


I used my knitting machine, of course, and black yarn of 2 different weights. 
I haven't yet tried making patterns with my machine, so this was an easy way to add a little bit of character to the scarf. 

I will be giving it to her in May when I see her for her wedding. 
While I doubt she will be using it in the next 6 months, I can't justify spending more money on the shipping than the item! 

{Daily Random Fact: According to history, the first scarf was made in Ancient Rome and it was called Sudarium from the Latin word "sweat cloth".} 

Thursday 18 April 2013

The seamstress that inspired me

I don't know if I have mentioned this yet, but my mother is a phenomenal seamstress.

I'm a little bias because she is my mother, but anyone who knows this wonderful lady will agree with me!

(flower girl dress that my mom made for Abby for a friend's wedding)

She has made so many outfits that were a critical part of my siblings' and I's childhood, from Halloween costumes to prom attire. Most recently, amid the hundreds of dresses she has made for my sister, she also made my wedding dress and most of my family's clothes for my wedding.


I know most of us look up to our parents, and I am definitely one of those people! My mother is my inspiration for learning how to sew and improve my talents that were handed down by genetics, as well as daily observation of a fantastic seamstress.

I have always been proud to wear the clothes my mom has taken the time to make for me. I can't say Abby will feel the same about me, but I can try!

Reduce, reuse, and upcycle. 
On my way to being the kind of seamstress I can be happy with.

Thanks mom!


Daily Random Fact: The highest-paid Victoria’s Secret model of all time is Giselle Bündchen. At one point, she was earning nearly $5 million a year.

Friday 5 April 2013

Duvet Cover to Skirt : Abby edition

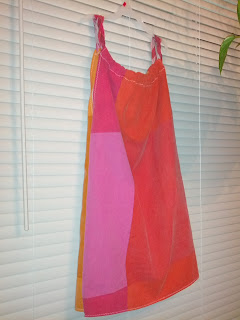
I started off with the intention of making a ruffle skirt for Abby, but changed my mind after seeing a ton of tutorials for a pillowcase dress.

A skirt would have had to be a lot more precise and that's just not my style, so I took the easy way out and made this pillowcase dress (which was inspired by Anneliese at Aesthetic Nest)..


It was super easy to make!

I roughly measured a chunk of the duvet cover to Abby's body, under the arms, and ripped it down until I had the approximate length.

Next, I folded it in half and ironed the entire piece to get it flat and create a seam on the side that was just folded. Once that was done, I cut a slit on the one side that wasn't open, to create an armhole. I ironed the pieces in a small triangle shape, instead of a 'u' shaped armpit.

Easy way out - I warned you!

Then, I sewed the one side shut, up to the armpit hole. I used a zigzag stitch to sew the armpit part because I knew the stitch would be seen and I thought that I would make it a little more fun!
Once I had sewn the armpits, I ripped 6 pieces of fabric, about 1/2 inch wide, and made 2 braids, then threaded them through the top pieces, and sewed them together.  
Looking back, I could have done 1 long braid and sewn the ends together - silly me!

I recommend this dress to anybody! 
If you have a large piece of material that you would like me to turn into a pillowcase dress or shirt - bring it!

Daily Random Fact: Himalayas means "abode of snow".

Duvet Cover to Skirt : Mel edition

Spring is here, so skirts are on the menu!

I have given myself a crafting challenge! I will not buy anything for crafting purposes until my birthday - that's 5 1/2 months - I think I can do it! It's going to be a good clean up/motivation to finish projects! And I'm ridiculously motivated to sew!

It may have to do with the fact that my sewing machine is fixed, or the fact that I want to re-purpose everything in sight, or the fact that spring screams skirt weather - I think it's a bit of everything! 

Side-note.. I even set up a temporary sewing station! 


Seriously, how great are skirts?! I know not every girl likes wearing them, but who can argue with the comfortable ones?!

Well, recently, Mel was donating her IKEA duvet cover (that I'm pretty sure half of the population owns, including myself) and I snagged it before she had the opportunity to give it up - phew! We decided that I should make a matching skirt for her, Abby, and I (and maybe a doll) for our annual family pictures.

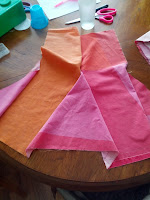
So, I started with Mel's skirt because I had quite a vision - different colored panels and triangles to create a fun, flowy skirt. 

I ripped the panels, since the sheet is cotton, to get the straightest edges possible. Then, with Mel's help, I folded some of the large rectangles and cut them down the middle in an angle, to get 2 triangles. 
Next, I dusted off my iron and put it to good use! I ironed every rectangle and triangle. 
Once everything was flattened, I pinned the front pieces together, and the back pieces together. 
For the back piece, I used an equilateral triangle because it was my best guess as to how to join the triangle pieces.

Once everything was pinned, I began sewing everything together - the best part! 
After that, it better resembled the finish product, so I ironed a seam allowance, and sewed it. I ended up using all beige thread because i don't have any other color thread besides blue and I think the beige is better in this case! 

The final part was sewing the waist band on. 
Mel had an old shirt that I used as the waist band. I cut the bottom half of the t-shirt, pinned it while stretching it out to the top of the skirt, and sewed it on using elastic thread. 

All in all, this skirt was pretty easy to make! And lots of fun! 
And of course, super cute!
See?!

Bring me some material for an adorable spring skirt!

{Daily Random Fact: Las Vegas means "The Meadows" in Spanish.}

Saturday 16 March 2013

DIY Che Sweater Scarf

The Draco claimed another victim - an awesome Che Guevara sweater!

This sweater has been in Jay's life longer than I have, so when the dog destroyed it, I wanted to find a way to honor it properly. I tried to find a way to turn it into some baby apparel, but I couldn't really figure it out. My original idea was to use the sleeves as baby pants, which Gina does here. An awesome idea, but Jay's sweater sleeves would be too big, and I didn't want The Professor to look like a rapper bum.

So, I ripped the shirt under the armpit, to get the straightest line possible. 
Next, I sewed every piece shut that was once ripped.


I added a scarf, that I cut up and braided, for a little color. I have a large number of scarves, and I wasn't wearing this one, so I wanted to upcycle it also! I also sewed a little heart patch with part of the scarf :)

It looks a little odd because I just cut the hood off and sewed randomly. BUT it's and infinity scarf for me and really comfy! 


Done. Another successful upcycle! 

A lot can be done with a sweater once you're done with it so get out your scissor before getting out your trash bag! And if sewing is not your thing, bring it over and we can work on it together!

Happy Saturday!

{Daily Random Fact: The term "scumbag" originally meant condom.}


Braided Fabric Bracelet


Is there anything better than turning something old into something new - for free?!

I made myself this braided bracelet (try saying that 5 times in a row quickly) to match a dress I am in the process of making.

I bought the cute clip with a bow at my latest Value Village trip and it cost me a whopping $1 for an entire bag of these suckers! And there must be at least 50 of them in the bag!
** If you are looking for one of these cuties, let me know! A little hand stitching, some fabric, and a bow clip, go a long way!

I used the seams of the scrap pieces of material from my husband's shirt that was destroyed in the great dog attack of 2013. 

Once I get my sewing machine in running order, the dress will be done in no time! I'm keeping all the scrapes so I can make other accessories! 

Reduce, upcycle and make your children be the models for your latest creation because they don't have hairy arms!

{Daily Random Fact: Bilinguals can be dyslexic in one language but not the other.}

Wednesday 30 January 2013

Initiating fun!

The beginning.


What is Melodry Creations? 
It's a haven where Mel and I craft for fun, and share our experiences with you.
(check out my previous blog post about Melodry)

Why?
Why not! We enjoy crafting!
Follow us, like us, and if you like what you see, we'll make you your very own.

Mel and I, along with the wonderful skills of my mother, have made a variety of crafts, but this one is too cute to pass up - a crochet bunny! 

Mel is the crochet expert, my mom is the sewing expert, and I am the one who blogs about it all! And of course, if you follow my personal blog, you will see what I am up to! 


Craft: Crochet Bunny
Artist: Mel

Mel made this crochet bunny for a co-worker.
How cute is that?! I'm a little bias though... I have a thing for buttons!  

A little yarn, stuffing, and some buttons, go a long way!

Another successful craft! 

This is just the beginning.. stay tuned for my posts on some things old, and some things new at Melodry Creations. 

{Daily Random Fact: Elephants are the only animals that can't jump.}